Creating an embedded hashtag system in Laravel - Part 2
Posted 21 July 2017 in Development
Part 1 of this tutorial can be found at Creating an embedded hashtag system in Laravel - Part 1.
In my previous post I outlined how to set up an embedded tagging system that will extract hashtags from a post, convert them into clickable hyperlinks, and attach them to the post. In this article we will look at wiring up a convenient autocomplete in the UI that not only allows for quicker writing, but also consistency in the use of tags.
The Search Index
Unlike most simple autocomplete tutorials that try to build the search into their own application, we will be using Algolia, an external search-as-a-service, because:
- It's fast - like, really fast. Average request latency for the Australian region is around 50ms or less!
- No additional load on our server
- Supports typo-tolerance
- It just works
This may seem like a little overkill for a simple self-hosted microblog, but I wanted to put something together that would scale to much larger projects. This example will work using Algolia's free trial tier, so there is no need to get the credit card out to give it spin.
I will also probably also write up a supplemental article that explores using a self-hosted solution, so don't worry too much if you don't want to give Algolia a try (even though you really should!).
Setting Up Algolia
Head on over to www.algolia.com and sign up for a free trial. It should auto-slect the region that is closest to your IP address to give maximum performance, but if it doesn't there are currently 14 to choose from during the registration process.
You can skip the tutorial and head straight to your dashboard to gather the information that we will need for the next step. In the sidebar, click on the API Keys link.
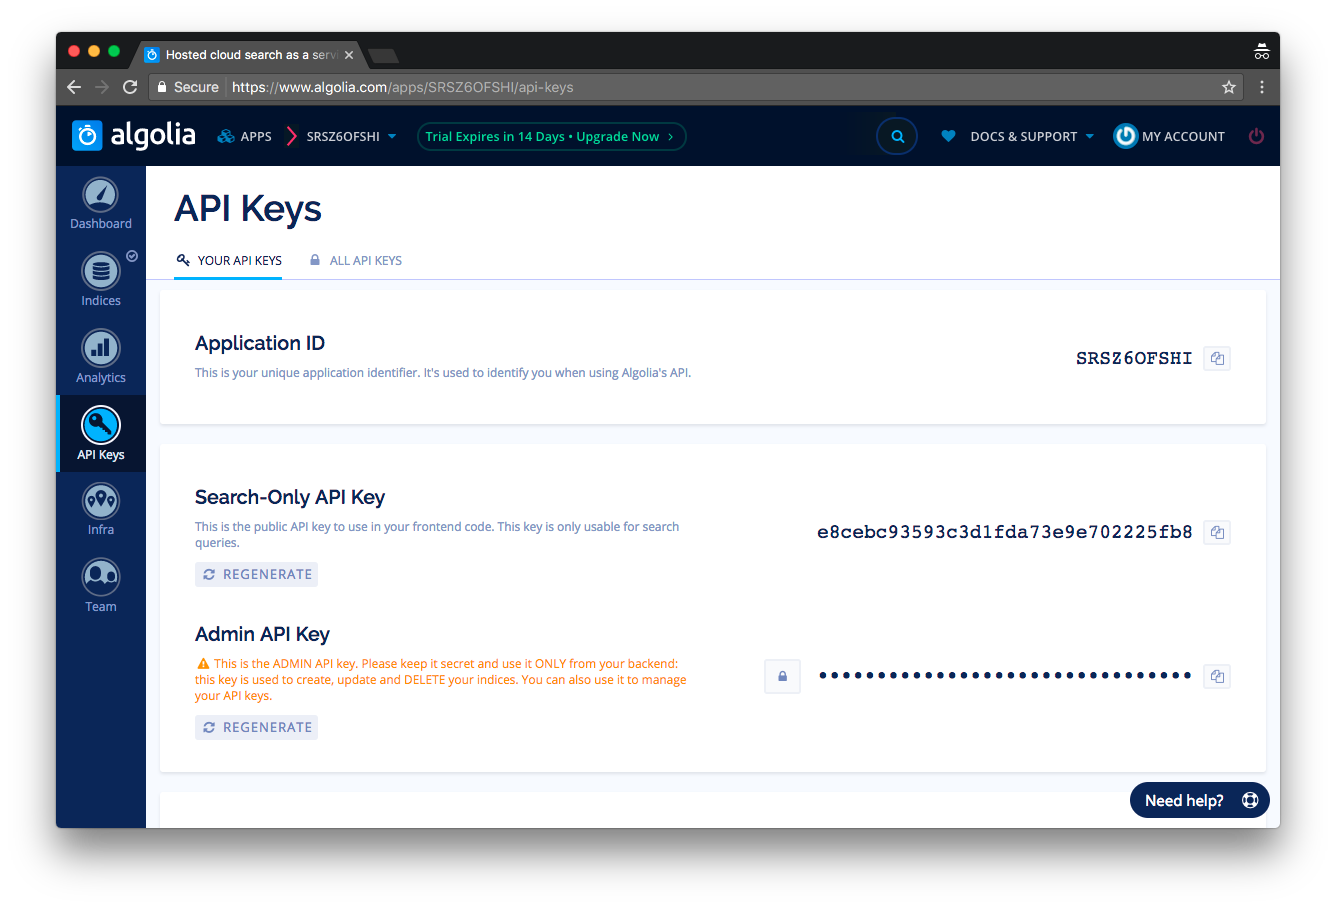
We will need the Application ID, Search-Only API Key and the Admin API Key in the next step.
Populating the index
We are going to automatically push the tags in our database into the Algolia index whenever they are created or updated (and removed if they are deleted). Luckily there is a package for Laravel that more-or-less does this automatically behind the scenes.
First, install the Laravel Algolia package using Composer:
composer require algolia/algoliasearch-laravel
Next add the package service provider to the providers array in config/app.php:
// config/app.php
'providers' => [
	...
	AlgoliaSearch\Laravel\AlgoliaServiceProvider::class,
	...
],
Once that is done we can publish the package-specific configuration file:
php artisan vendor:publish --provider="Vinkla\Algolia\AlgoliaServiceProvider"
Edit config/algolia.php to reference environment variables rather than hard-coding your Algolia application ID and API key:
// config/algolia.php
...
'connections' => [
    'main' => [
        'id' => env('ALGOLIA_APPLICATION_ID'),
        'key' => env('ALGOLIA_API_KEY'),
    ],
	...
],
...
Finally we can add those variables from your Algolia account to our .env file. Please note, the ALGOLIA_API_KEY is the Admin API Key in your Algolia dashboard:
// .env
...
ALGOLIA_APPLICATION_ID=
ALGOLIA_API_KEY=
ALGOLIA_SEARCH_KEY=
...
Next we need to update the Tag model so that it automatically publishes to Algolia. Since the model is inside the Spatie package we will create a new model that simply extends the original class, and then tell our Post model to use that instead.
Create a new PHP class:
// app/Tag.php

namespace App;

use AlgoliaSearch\Laravel\AlgoliaEloquentTrait;
use Spatie\Tags\Tag as Model;

class Tag extends Model
{
    use AlgoliaEloquentTrait;
}
Then add the following to app/Post.php (if you use a different namespace for your custom Tag model ensure you update it here):
// app/Post.php

...
public static function getTagClassName(): string
{
    return \App\Tag::class;
}
...
Finally, if you have already been playing about with tags after the previous tutorial, you can push them up into Algolia with simple command:
php artisan tinker
...
>>> App\Tag::reindex();
=> null
By default, the AlgoliaEloquentTrait will create an index with the same name as our local database table - in this case tags and will push up an entire JSON representation of each model. If you quickly publish some posts with a few hashtags and then head back to the Indices view on the Algolia dashboard, you will see that a new index has been created (tags) and it has been populated.

Our index is a really simple one that we are performing basic text-based searches on so there is no need to set up custom ranking or indexing criteria at this stage.
Wiring up the UI
To ease the autocomplete integration we will leverage the power of the a jQuery plugin called jquery-textcomplete and configure it to perform search calls against the Algolia API. For that, we’ll also use the latest version of Algolia's JS API client available on Github or directly from the JsDeliver CDN, by including https://cdn.jsdelivr.net/algoliasearch/3/algoliasearch.min.js.
HTML
There is nothing special here. We include the CSS/JS files of the jquery-textcomplete plugin and import the latest version of the Algolia's JS API Client. We also add a textarea element inside the <body> section.
<head>
	<!-- Basic Bootstrap styling -->
	<link rel="stylesheet" href="https://maxcdn.bootstrapcdn.com/bootstrap/3.3.7/css/bootstrap.min.css">
</head>

<body>
	<textarea class="form-control" rows="5" id="autocomplete-textarea" name="body">

	<!-- jQuery -->
	<script src="http://code.jquery.com/jquery.js"></script>

	<!-- Text Autocomplete plugin -->
	<script src="./jquery.textcomplete.min.js"></script>

	<!-- Algolia Search API Client - latest version -->
	<script src="https://cdn.jsdelivr.net/algoliasearch/3/algoliasearch.min.js"></script>
</body>
CSS
Next we will need to add some additional styling (inline in the <head> is fine) for the autocomplete:
#autocomplete-textarea {
  min-height: 80px;
  color: #000;
}
#autocomplete-textarea a {
  text-decoration: none;
  font-weight: normal;
  color: #181818;
}
.dropdown-menu .textcomplete-item a,
.dropdown-menu .textcomplete-item a:hover {
  cursor: pointer;
  font-weight: normal;
  color: #000;
  position: relative;
  padding: 3px 10px;
}
.dropdown-menu .textcomplete-item.active a {
  background: #F0F0F0;
}
/* Highlighting of the matching part
   of each search result */
.dropdown-menu .textcomplete-item a em {
  font-style: normal;
  font-weight: bold;
}
.dropdown-menu .textcomplete-footer {
  border-top: solid 1px #F0F0F0;
  margin-top: 3px;
}
Javascript
And finally the most interesting part - where it all comes together and the #hashtag and search logic gets integrated.
Copy and paste the ALGOLIA_APP_ID and ALGOLIA_SEARCH_KEY into the source code (or if you are using a Blade template you can reference the values in your .env file with {{ env('ALGOLIA_APPLICATION_ID') }} and {{ env('ALGOLIA_SEARCH_KEY') }}):
$(function() {
    var ALGOLIA_APP_ID = '';
    var ALGOLIA_SEARCH_KEY = '';
    var ALGOLIA_INDEX_NAME = 'tags';
    var NB_RESULTS_DISPLAYED = 5;

    // Algolia API Client Initialization
    var algoliaClient = new algoliasearch(ALGOLIA_APP_ID, ALGOLIA_SEARCH_KEY);
    var index = algoliaClient.initIndex(ALGOLIA_INDEX_NAME);
    var lastQuery = '';

    $('#autocomplete-textarea').textcomplete([
        {
            // Regular expression used to trigger the autocomplete dropdown
            match: /(^|\s)#(\w*(?:\s*\w*))$/,

            // Function called at every new keystroke
            search: function(query, callback) {
                lastQuery = query;
                index.search(lastQuery, { hitsPerPage: NB_RESULTS_DISPLAYED })
                    .then(function searchSuccess(content) {
                        if (content.query === lastQuery) {
                            callback(content.hits);
                        }
                    })
                    .catch(function searchFailure(err) {
                        console.error(err);
                    });
            },

            // Template used to display each result obtained by the Algolia API
            template: function (hit) {
                // Returns the highlighted version of the name attribute
                return '#' + hit._highlightResult.slug.en.value;
            },

            // Template used to display the selected result in the textarea
            replace: function (hit) {
                return ' #' + hit.slug.en.trim() + ' ';
            }
        }
    ], {

    // Include Algolia branding since this is using the free trial
    footer: '<div style="text-align: center; display: block; font-size:12px; margin: 5px 0 0 0;">Powered by <a href="http://www.algolia.com"><img src="https://www.algolia.com/assets/algolia128x40.png" style="height: 14px;" /></a></div>'
    });
});
And that's it - the #hashtag feature is now ready to use!
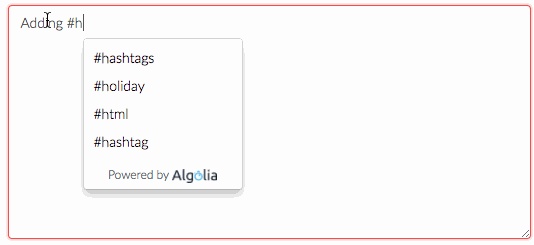
As you can see, the values that we are displaying are using the English version in the tag's JSON structure, but you can change this depending on what translation options you are using in Spatie's tag package.
Email a comment